Показаны сообщения с ярлыком How To. Показать все сообщения

среда, 12 февраля 2020 г.

How to Fold a Pocket Square – My Top 8 Folds for Gentlemen

Pocket squares are one of my favorite accessories, and I hardly ever leave the house without one (except maybe if I’m wearing a big boutonniere, in which case a pocket square would just throw everything off-balance visually). But there are many different ways to fold them–I’ll cover my eight favorites (plus a bonus) today.

Two General Pocket Square Tips

Before we walk through the pocket square folds, it’s important to keep two things in mind; first, different pocket squares have different sizes. For example, those that are too small will likely disappear into your pocket. Ideally, you want something that works perfectly for your chest pocket. At Fort Belvedere, we’re firm believers in producing pocket squares that make you look your best, and that means every material corresponds to a different size, because no two textures, stiffnesses, and weights are the same.
Secondly, as is the case with a self-tied bow tie, you never want your pocket square to look like it’s folded too perfectly, too neatly, or too symmetrically. Why? Because you want to strive for a nonchalant elegance that just looks like the square fell into place, and not like you ironed a fold into the pocket square; this will make it look like a pre-folded one, and that’s never stylish.

1. Classic Fold

The classic fold is also known as the square fold, the straight fold, the TV fold, or the presidential fold. It’s a very traditional fold, typically seen on news anchors, at weddings, or maybe in formal offices at a law firm. Of course, I’ll also show you how to make it look a bit more casual. In general, this type of a fold looks best with linen or cotton pocket squares which have a bit of stiffness to them.
  • With the square laid flat, fold in half once, then a second time (in other words, into quarters)
  • With the rolled edge at the top, fold in the left and right sides (into thirds)
  • Then, fold the bottom upward, so the at the total height of the square corresponds to the depth of your pocket
You may have to adjust it a little bit, until you show about 1/4 to 1/2 an inch out of your pocket. Traditionally, the four corners point toward your left shoulder, though some people prefer it to point the other way.
If I don’t want this kind of a stiff fold, I can arrange the corners so that they’re not completely straight when making the first two folds; this will make the finished square more nonchalant. If you have stronger contrast edges, you can accentuate them a little more this way. If you see an exposed tag (for this fold or any other), just make sure to fold it in so it’s not visible–or start over and just fold in a different direction. To remove a tag, a small pair of nail scissors or a seam ripper is best. 

2. Crown Fold/Point Fold

This one looks particularly good with a contrast edge or some cross stitching, and a square that has a little bit of stiffness to it, such as a linen, wool, or wool-silk square. You can also work with a silk pocket square, just make sure it’s big enough so it doesn’t disappear in your pocket.
  • With the square laid flat, orient it so that the top corner is pointing away from you (like a diamond)
  • Bring the bottom corner (nearest you) up to the top, spacing the corners slightly apart
  • Bring the left and right corners up to the top, also spacing them apart, so you can see all four points
  • Fold in again from both sides, and then fold up to match the depth of your pocket 
You never want this fold to look too symmetrical, otherwise, it looks like a pre-fold pocket square. So, when you start out, you can pull a corner or two slightly higher or lower to be a little more playful. Alternatively, you can space two corners much farther apart during the fold, then compensate at a later fold to make sure the square fits in your pocket.
The third option is to lay the square flat, pinch it in the middle, you pull it through your opposite fist, twist it by half, and then put it in your pocket. The advantage of this fold is that it always looks very effortless, and is always slightly different. Some people like it, others hate it. If you want more consistency, go with the first method; if you want more nonchalance, try the second or third method.
For a crown fold, you want to make sure that you have hand-rolled edges, because they look a lot nicer than machine-hemmed ones. A pocket square is a decorative piece and because of that, you always want to have the best possible edge which is a hand-rolled edge. To learn more about the differences in quality of hand-rolled edges, please check out the video below.

3. Puff Fold/Pinch Fold

This looks particularly dapper in a silk or silk-wool blend, because the folds break light in a very sophisticated way. I’ve made this fold with a linen pocket square before, but if it’s too stiff, chances are it will pop out over the course of the day (which doesn’t look stylish).
  • As with the third method for the point fold above, start with the square laid flat, pinch in the center, and run the square through your opposite fist.
  • Next, twist either by a half or full rotation, then adjust the finished puff to your liking. That’s all!
By creating the rotation, you keep the pocket square and the little folds in place. That way, you can see the light breaks very nicely and very elegantly. Some people like to push the center of the finished puff in on itself at the end; personally, I don’t like it very much because over the course of the day, it’ll just puff out–then in your pocket, you’re left with a big “poof” that’s not very elegant.
A way to get a somewhat more irregular puff is to take the square by one corner and tuck it into your pocket, then repeating with the other three corners, until you’re left with a puff that you like (you won’t be able to add a securing twist this way, however).

4. Upside-Down Puff Fold

I think this one works particularly well with a silk or silk-wool pocket square (linen can be a little stiff). Ideally, the center of your pocket square has a different look than the edges. That way, you do maximum versatility and flexibility and creating a look that is unique.
The upside-down puff fold is very similar to both the point fold and the puff fold:
  • Start by forming a puff fold via the primary method (ending with a twist)
  • Before inserting into your pocket, fold as many of the points up from the bottom as you would like to be exposed behind the puff
The beauty is that you can show anywhere from one to four points, as well as the center (which is ideal if you have something like a central medallion design). The points of the pocket square can be arranged however you like–just make sure your pocket square is large enough so it won’t disappear in your pocket!

5. Shell Fold

This fold is unusual; you don’t see it a lot, it requires a bit of skill, and I like it with a silk or silk-wool pocket square that is sizable, otherwise, it’ll just disappear in your pocket.
  • Start with the square laid flat, with the backside (less colorful) facing up
  • Fold in half diagonally, to create a large triangle
  • Placing your index finger in the center of the long edge, fold in half again, leaving the corners separated slightly (so that the folded edge is at a slight angle, rather than perfectly straight)
  • Take the corners opposite the angled edge and fold them up to the top corners, again creating a slight angle; you should now have what looks like three triangles stacked on top of each other, with the bottom two still slightly visible
  • Fold in the center of the stacked edge, so you’re left with three “shells” to expose from your pocket
As you’ll see, this can look quite symmetrical (again, this is not something you want); pull gently on each of the shells to get a slightly different look that is askew and more elegant. When you use a silk-wool pocket square, the look is a little more matte. On the other hand, if you use a silk pocket square, it’s a little more vibrant.

6. Scallop Fold

This fold really highlights the edges of a pocket square, so it works well with contrasting edges and something that is visually interesting. It is similar to the shell fold in the sense that it uses the curves of the pocket square. I think it looks particularly nice if you have a contrast edge or a cross-stitched edge. The contrast between the edge and the pocket square is important.
  • As with the shell fold, start with the square laid flat and the backside facing up
  • Fold in half diagonally once, leaving the edges slightly askew, so that they’re all exposed
  • Fold in half again along the long (folded edge), again at a slight angle, so you’re left with a triangle whose long side shows multiple pocket square edges
  • With the “edge side” facing away from you, fold the left and right corners down toward the center point
  • Fold in from the left and right sides again, then fold to the depth of your pocket


Scallop Fold
Scallop Fold
Once the square is in your pocket, adjust the scalloped edges just so they’re a little more elegant and nonchalant. You can see the contrast edges create an interesting visual cue. If you’d like, you can also perform the last fold slightly asymmetrically, to get a more unusual, elliptical curve. I just like it when it looks a bit different and not too studied.

7. Rose Fold

This fold works especially well with patterned pocket squares, particularly where the pattern is clearly visible on both sides.
  • Start with the square laid flat and the backside facing up
  • Fold each corner into the center, creating a diamond shape reminiscent of a package
  • Pinch in the center (it may work best to use three fingers), pick up the square, and close your opposite hand around it, in a way reminiscent to the puff fold
  • Pull at the puffed center, insert into your pocket, and adjust so that the corners and center are all displayed to your liking
While similar to the reverse puff fold, this fold differs in that the puff is nestled inside the four corners, suggesting a rose. Using a square with contrast edges and a center medallion, you’ll be able to achieve maximum color variance with this fold.

8. Angel’s Peak Fold

This fold is very similar to a crown fold; I typically prefer the crown, but if you have a contrast edge, the angel’s peak fold puts the contrast in a different position, which can look quite elegant. Just keep in mind that this fold will require adjustment after being inserted into the pocket, so as not to look pre-folded.
  • Begin in the same way as you would for a shell fold: 
    • Start with the square laid flat., then fold in half diagonally to create a large triangle
    • Placing your index finger in the center of the long edge, fold in half again, leaving the corners separated; here, the separation should be more pronounced than with a shell fold
    • Take the corners opposite the angled edge and fold them up to the top corners, again with a pronounced angle; you should now have what looks like three stacked triangles, with each one distinctly visible
  • You can now pull at the inside of the uppermost triangle to create a fourth point
  • Fold the sides inward to slim down the square, then fold to the depth of your pocket
Ideally, you want to pull some of the corners slightly higher and/or lower, just so you get a more effortless look, not something that looks too studied. If you use a linen square with x-stitched edges, the contrast will be elegantly displayed.

Bonus: Stair Fold

Of course, there are plenty of other folds than the eight we’ve profiled here. Another really popular one is the stair fold. Personally, I’m not a big fan of it because it looks very symmetrical, like I got it in a prepackaged set from Men’s Wearhouse. In my mind, the only way a stair fold looks good is if you have a center medallion and a contrast edge, and a silk-wool blend that is soft enough to actually get the right definition. If you have something too springy, like a linen fabric, it just won’t work.
  • With the square laid flat, orient it in a diamond shape
  • Take the point farthest from you and pull it downward, past the point closest to you, creating a shape reminiscent of the Superman logo
  • Still pulling on the same point, pull it back up, making sure to maintain the original fold you created at the top
  • Repeat this process one to three more times, to be left with two to four parallel folds opposite you
  • Fold in half along the parallel folds, in a similar fashion to the shell fold
  • Bring the sides in to slim the square, then insert into your pocket


Stair Fold - I am not really a fan of this particular fold
Stair Fold – I am not really a fan of this particular fold
The highest point on the resulting triangle shape in your pocket can either point toward or away from your tie, whichever you prefer. I always orient the right to be a little higher. As with the shell fold, pull a little bit on each fold and try for a nonchalant look.

Conclusion

I urge you to experiment a bit, because with practice comes better folds. All the quality pocket squares featured in this post are available in our shop. I designed them all myself to make sure they have the proper size, as well as an unusual color scheme that picks up other colors in your outfit, so it always looks harmonious and elegant. If you have a monogrammed pocket square, try using a fold that will place the monogram front and center.

Our Previous Video On This Topic

If you have been with us for a while, you may have already seen our video from years ago on pocket square folding. We’ve come a long way since we first filmed and posted it. Even so, for those interested, here’s our original video!

What are your favorite folds? Please share your thoughts in the comments below!

Peacoat Guide – A Classic Wool Overcoat for Fall & Winter (History, Sizing & Where To Buy)

Today, we continue our overcoat series with the iconic Peacoat. We will explore the history of this classic garment and detail how to find the right cut, fabric, and buttons so you can make an informed decision about your own peacoat purchase.


The History of the Peacoat


Unlike the more defined history of the Trench Coat, the origins of the peacoat are more ambiguous. A version of the jacket has been worn by European and American sailors for nearly three centuries, so it’s probably not surprising that there are several differing versions of the peacoat story out there. Let’s look at them one by one. Like many garments, the history of the peacoat may not be exact, but it has certainly left an indelible impression upon classic fashion.


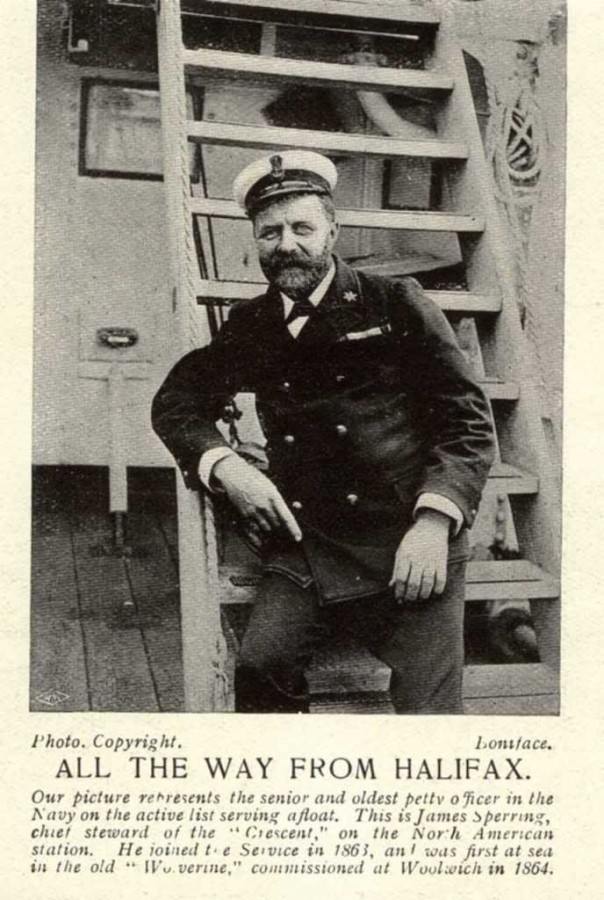
Peacoat around 1900

Peacoat around 1900


Peacoat Origins Story #1: The Dutch Version


The Oxford Dictionary dates the origin of the term pea jacket or peacoat to the early 18th century, claiming that it was most likely derived from the Dutch word pijjakker, from “pij” for ‘coat of coarse cloth’ + jekker for ‘jacket’. Since the Dutch were a naval power for many centuries, and the peacoat is commonly associated with seafaring, it does not seem far-fetched that the jacket was in fact from the Netherlands.


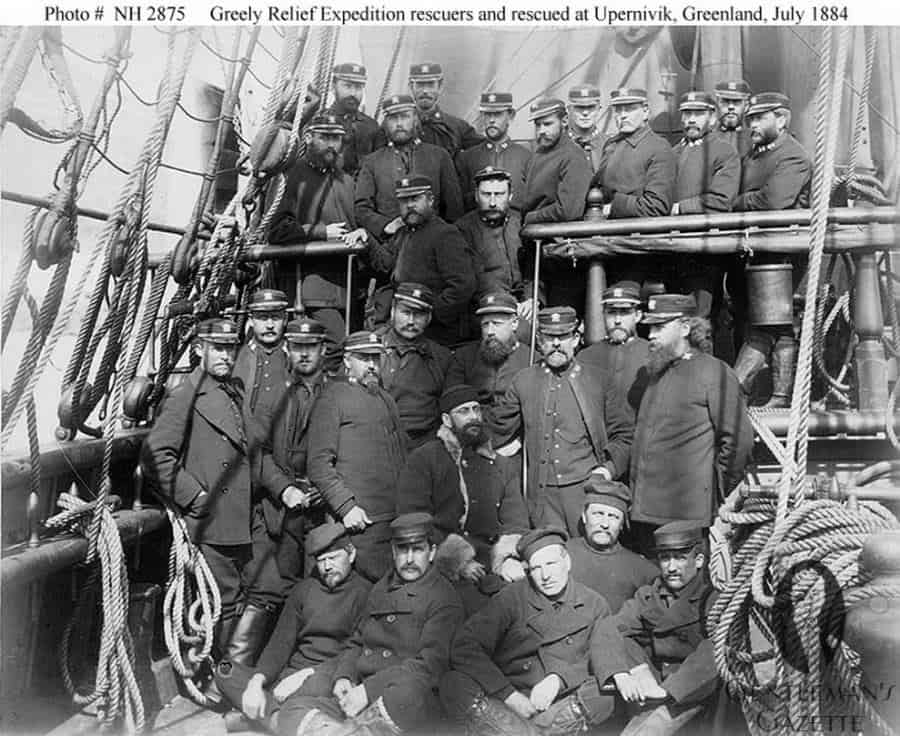
Peacoat in 1884

Peacoats on US sailors in 1884


Peacoat Origins Story #2: The Camplin Version


According to Camplin, a heritage British clothing brand that is now based in Italy, Mr. Edgard Camplin founded a store in 1850 in which he sold uniforms to the British navy. Apparently, he sold particularly well in India, starting in 1888.  After that, Mr. Camplin supposedly suggested – at an unknown date – to create a coat for the uniform of petty officers, who had the same uniform as sailors up until then. Instead of the officer’s greatcoat, the Camplin designed the Petty Coat, which was also known as a P. Coat.   The name eventually was popularized as Peacoat for phonetic reasons. This version of the story may be true, but it does not name any sources or dates other than the company’s own records; the company still sells peacoats based on the story that Mr. Edgard Camplin “invented” the peacoat.


Peacoat Origins Story #3: The Tailor & Cutter Version


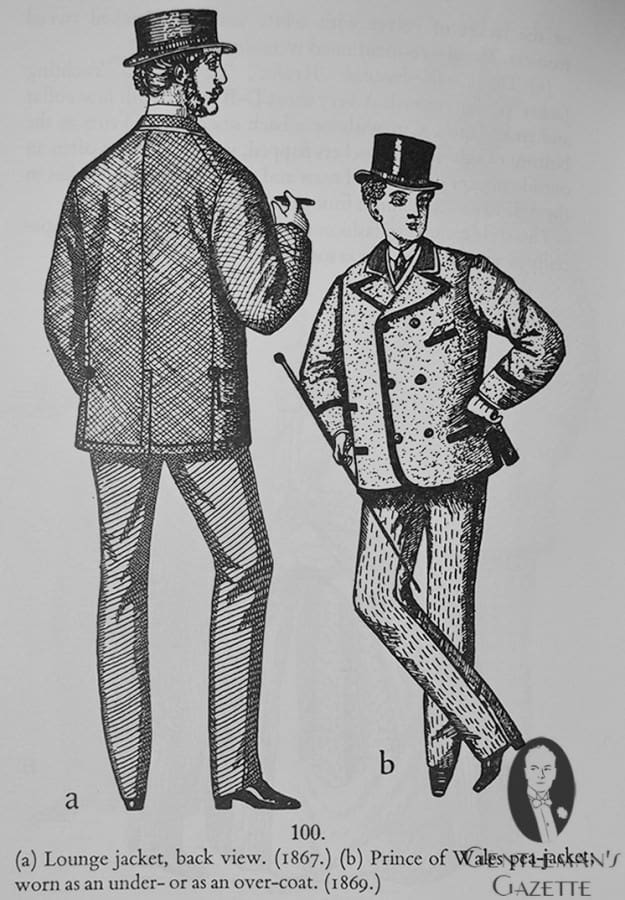
The Tailor & Cutter used to be the leading tailor trade magazine in England in the 19th century. It was published weekly and in addition to focusing on tailoring and cutting, it also featured fashion trends and etiquette. For example, if people began wearing new styles, Tailor & Cutter would comment on the clothing, which was particularly true for anything a Royal wore. In an issue from October 1868, they report about the so-called “the Prince of Wales Jacket” emerged, which characterized it as a loose double breasted jacket with three pairs of buttons, two cross pockets, and wide piping.


Prince of Wales Pea Jacket 1869

Prince of Wales Pea Jacket 1869


When intended for rough use, the coat was made of blue pilot-cloth lined with wool. For town wear, it was made of blue witney or another soft material with silk-faced lapels and a velvet collar. It was tailored with or without a back-seam and with short vents at the bottom. The illustration is from 1869 and describes it as a “Prince of Wales pea-jacket”. Chances are, the PoW was not the inventor, but rather he was the person who popularized it.


What is a Peacoat?


All these historic details now beg the question: what is a peacoat today? Let’s take a look at the three major components of a peacoat’s construction: the cut, the fabric, and the buttons.


The Cut of a Peacoat


The peacoat of today has a specific cut that reflects it’s functional origins. The peacoat is a simple jacket with a straight cut down the body. The length is slightly longer than a regular jacket, but it remains shorter than an overcoat like its predecessor.


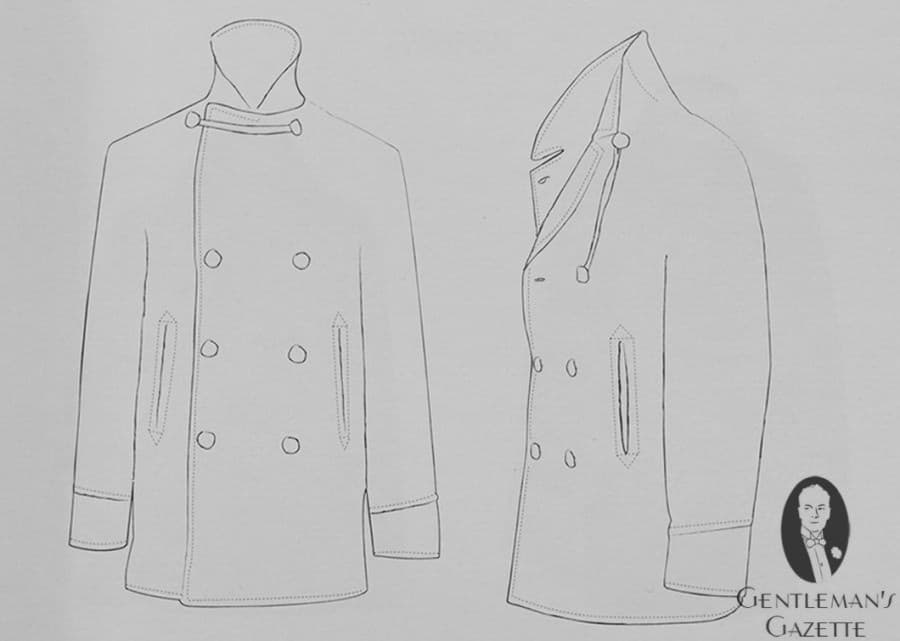
British Pea Coat Anatomy with Cordage & Buttons

British Pea Coat Anatomy with Cordage & Buttons


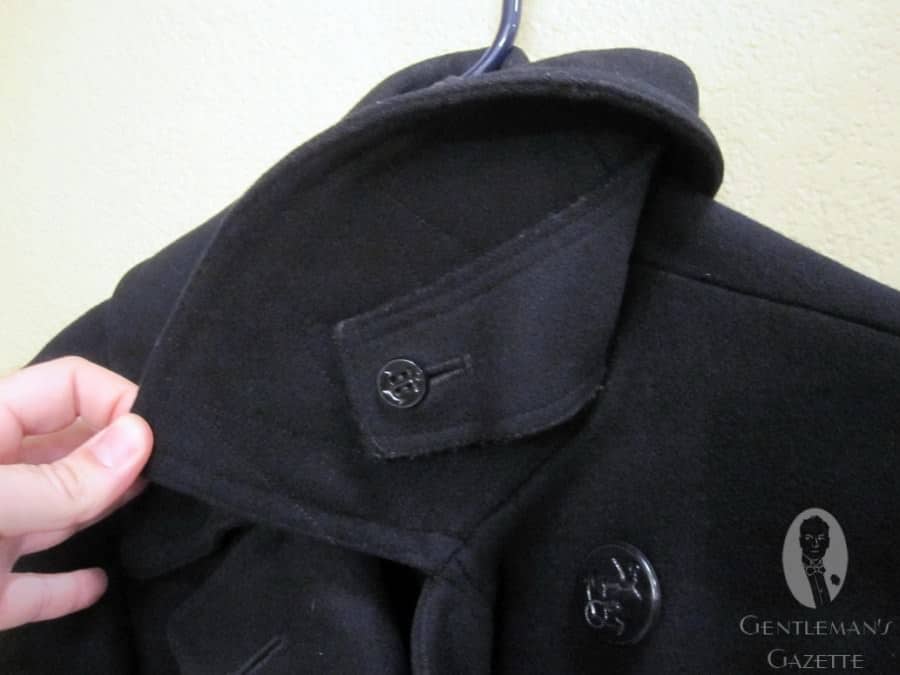
An oversized Ulster collar allows the wearer to button up the collar around the face for extra protection from the elements, using the 7th button (and occasionally the cordage, depending on the brand). If sailors wore many layers underneath, they were sometimes unable to button that 7th button and so they used cordage. The remaining 6 buttons are arranged traditionally on the double-breasted silhouette.


Peacoat Cordage

Peacoat Cordage


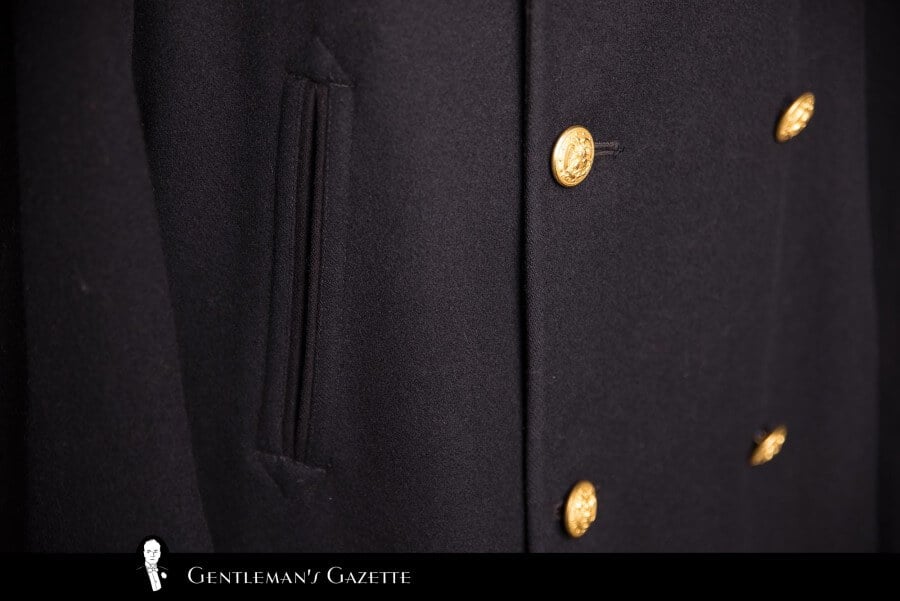
The very first peacoats seem to have had short side vents or no vents, whereas current US Navy peacoats feature a center vent. The vertical slit pockets were designed for easy access, and they usually also feature a little change pocket on the inside because US Navy pants did not have pockets. On the inside, you will find two pockets on either side for storage of your everyday carry items.


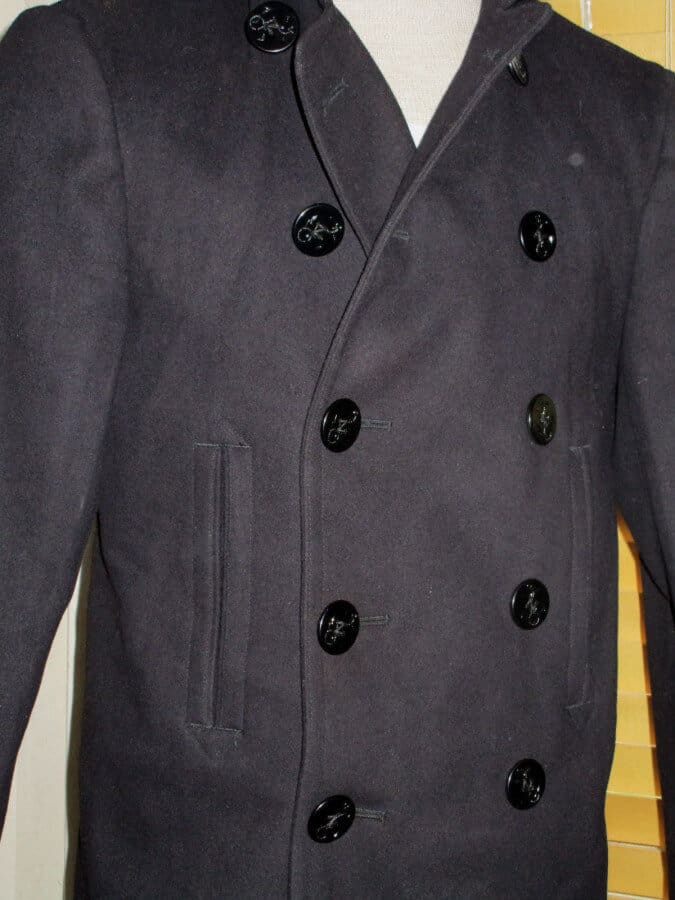
Peacoat Vertical Pockets and Buttons

Peacoat Vertical Pockets and Buttons


Aside from these simple details, the peacoat features no additional ornamentation, but it’s simplicity and clean lines have made it a reliable standard for a classic wardrobe.


Today, the US Navy provides the features of a peacoat: “A double-breasted, hip-length coat made of dark blue authorized fabric with a convertible collar, a set-in pocket in each forefront, and a single row of four 35-line plack plastic anchor buttons down the right front and three on the left.”


The correct wear is specified as:Button all buttons except collar button. The collar button may be buttoned in inclement weather.  Wear the jumper collar inside the coat.  Sleeves are to reach about three-quarters of the distance from the wrist to the knuckles when arms hang naturally at the sides.”


Peacoat Fabric


Today, the US Navy peacoat is made of a midnight blue 24 oz / 750 grams Melton of 80% wool and 20% artificial fibers. Traditionally, it was made of 100% Kersey wool, just like the Melton for the British Warm. As pointed out above, the pilot fabric was an option and later 100% wool Melton or Kersey was used, often in weights up to 34 oz. / 1050 / grams per yard / meter. Today, you can still find 100% wool melton fabrics, but usually not heavier than 24 oz, which is a shame because the heavier fabrics wear quite warm. If you can, get a heavy weight vintage coat, though good examples in decent shape are few and far between. If you opt for a modern version, skip the nylon and polyester blends and invest a bit more.


Occasionally, you will also find peacoats made in different materials such as canvas, cotton or nylon, but technically, these are not peacoats.


Buttons of a Peacoat


Throughout history, peacoats had a varying number of front buttons. During WWI they often had 10 buttons, later 8 and now mostly 6 with one hidden button under the right collar.


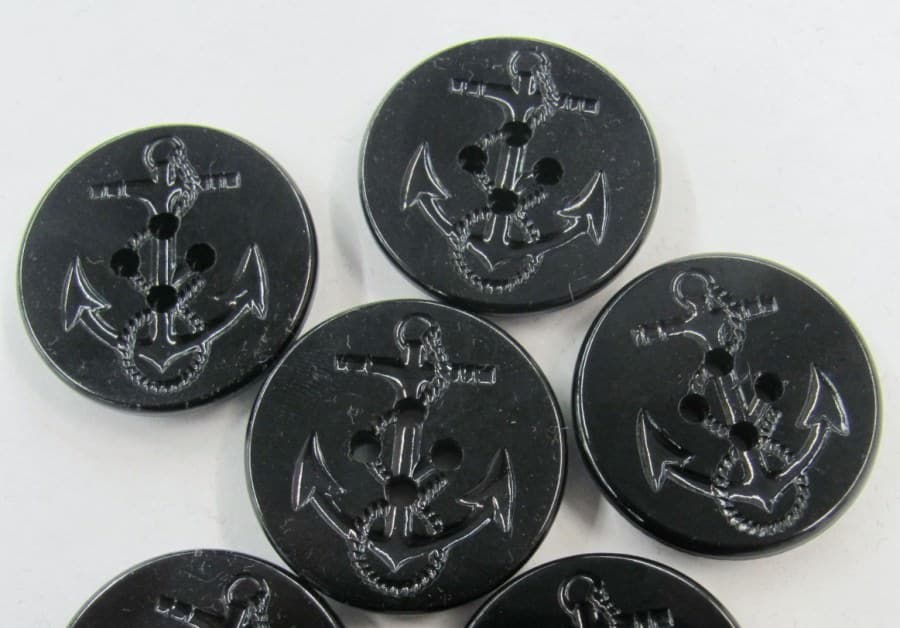
Today, US Navy peacoats feature large (35-ligne) thick black plastic buttons. Imprinted on the front is a “fouled anchor” design, which refers to the traditional image of an anchor wrapped in a rope. Apparently, the tradition of this logo dates back to the personal seal of Lord Howard of Effingham, the Lord High Admiral of England, when the British defeated the Spanish Armada in 1588. Following the victory, the design was then adopted as the official seal of the Lord High Admiral of Great Britain.


Black Anchor Peacoat Buttons of US Navy

Black Anchor Peacoat Buttons of US Navy


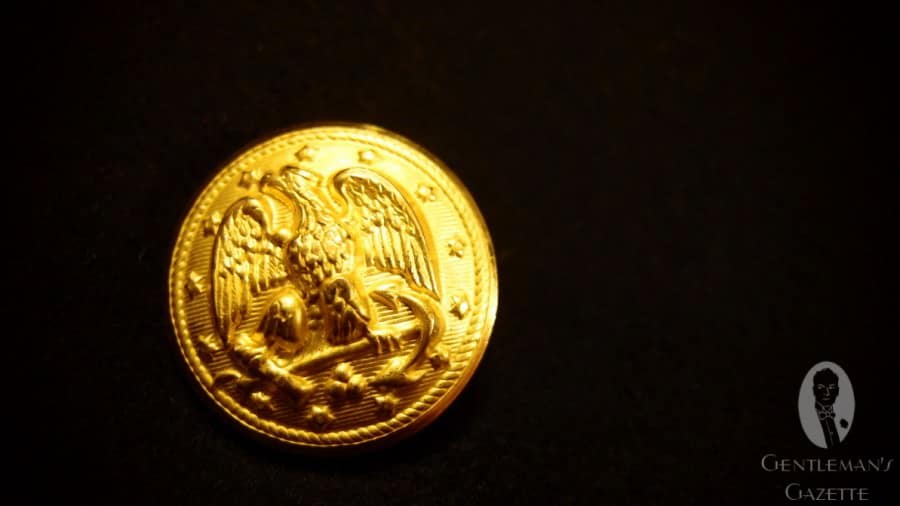
Every once in a while, you will also see gold brass buttons on a midnight blue peacoat. Traditionally, officers, warrant officers or chief petty officers could upgrade their peacoats with these buttons.


Brass Officer's Peacoat Button

Brass Officer’s Peacoat Button


Starting in the early 20th century,  peacoat buttons featured the large fouled anchor in the center with a ring of 13 stars surrounding it, spaced along the edge of the button face. At that time, the coat was also longer and had two additional horizontal pockets.


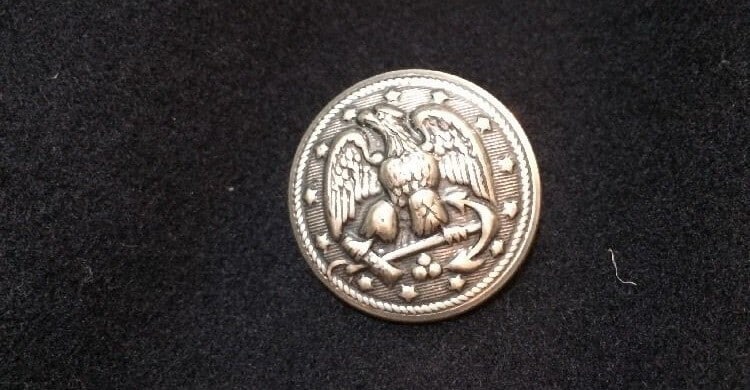
By the 1920s, peacoats had the buttons that are used today, but in the 1970’s Admiral Elmo Zumwalt had these buttons replaced with 40-ligne (1″) metal buttons that looked identical to the gold ones worn by officers, with the exception that they had a pewter color.


Pewter Button US Navy 1974 - 1984

Pewter Button US Navy 1974 – 1984


The pewter “Zumwalt” buttons do have an anchor in the design, but only as a perch for a large eagle; they also feature a small stack of cannonballs. In 1984, the pewter buttons disappeared again, and  “traditional” fouled anchor buttons returned.


While variants of the peacoat are used by many navies, and most use buttons with some variant of the fouled anchor design (with a crown, if the country is a kingdom), it is also true that many of these buttons are of brass, gold plated or not; or of anodized aluminum (“Stabrite”).  Sometimes the buttons are of black plastic or horn, but with metal shanks rather than four holes for sewing.


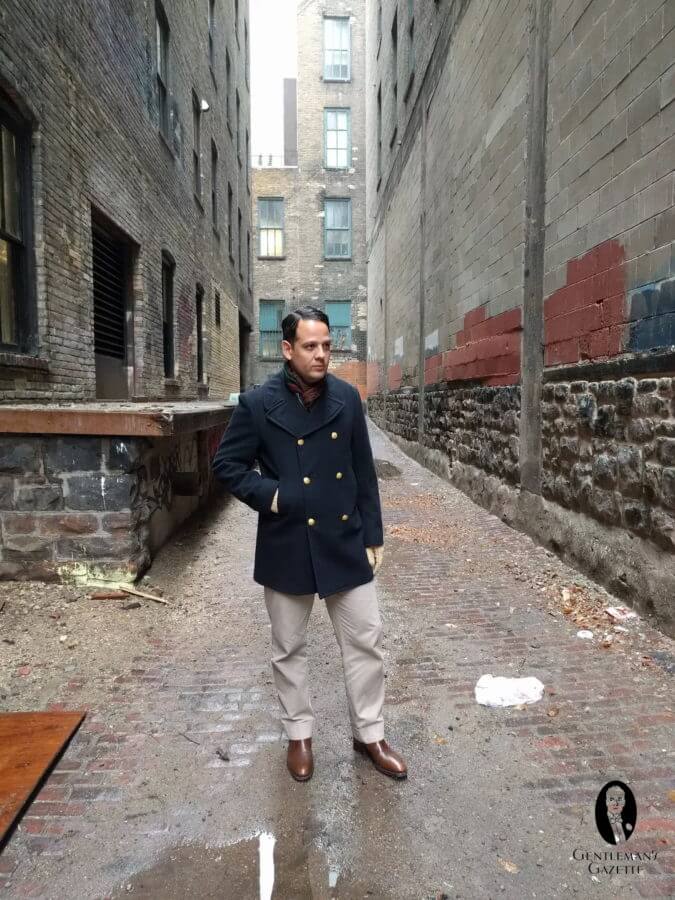
Some will argue that an authentic US Navy peacoat must have the black anchor plastic buttons, but you should bear in mind that as a civilian, you can wear whatever you want. For example, I think it looks great with gold buttons, pewter buttons, horn buttons or mother of pearl buttons. It’s nice to add a bit of contrast to an otherwise very simple jacket.


Peacoat with double sided scarf, Jodhpur boots and Chinos - Business Casual

US Navy peacoat with double sided scarf, Jodhpur boots and chinos – Business Casual


Personally, I have an original US Navy 100% wool officer’s peacoat with gold buttons from the 1980’s.


Where & How to Buy a Peacoat


If you want to buy a US Navy Peacoat, you can either buy a new one or a vintage one. Unfortunately, the Navy stopped issuing peacoats in May 2019, so new-old stock is the only remaining option if you want an unworn US Navy issue peacoat.


Recent peacoats are thinner due to the nylon blended into the fabric, while older versions in good shape are not easy to find. But no matter what you buy, the sizing has to be right to look good.


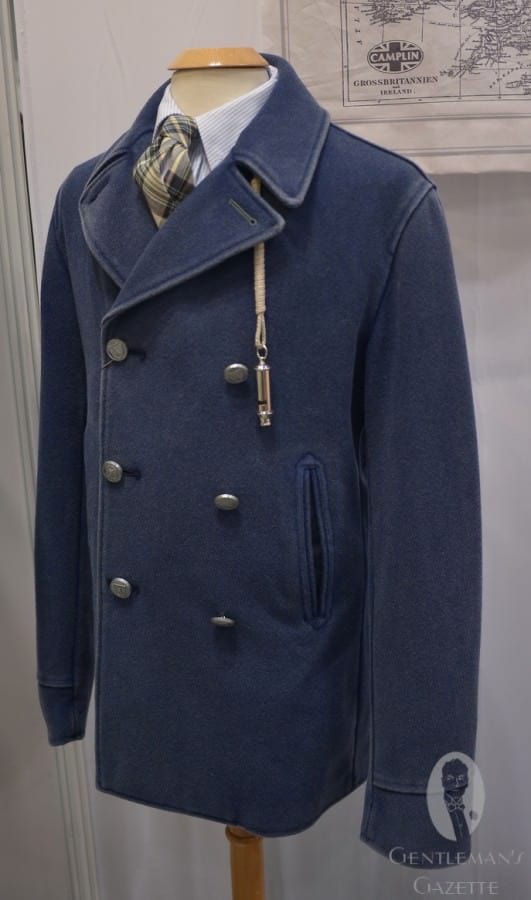
Vintage Looking Camplin Peacoat

Vintage Looking Camplin Peacoat


Peacoat Sizing


Traditionally peacoats are worn fitted, but not so tight that the vent gaps or you have wrinkles when buttoning the coat. To find the right size for you, you have to determine how you like the fit of your peacoat and physically measure your chest with a measuring tape.


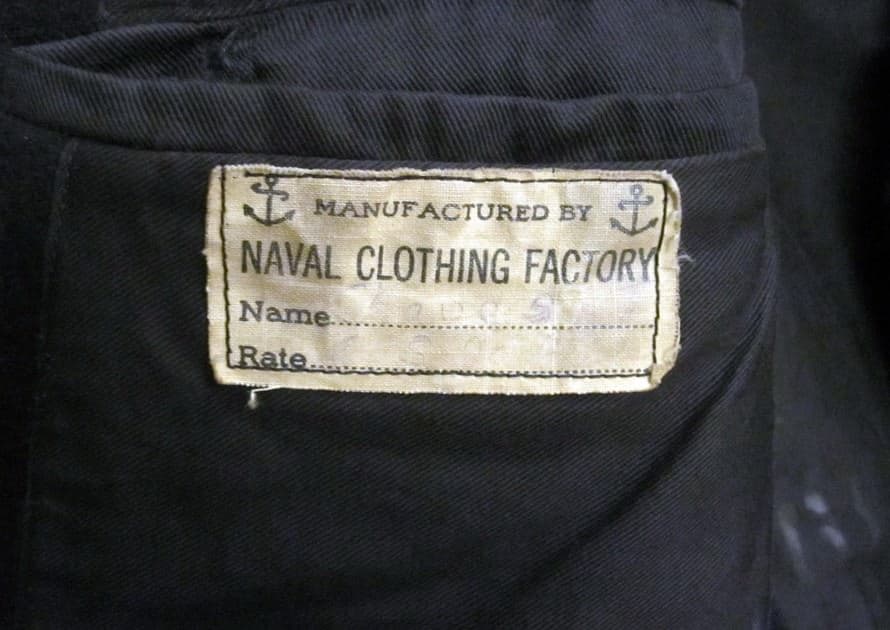
Vintage WWII Peacoat Tag

Vintage WWII Peacoat Tag


For example, my chest is 44 inches, and I wear a 42L peacoat, which measures 45 inches in the chest. I am 6 ft tall with long arms, which is why I opted for the long version rather than the regular model. I do have enough space to wear a thick sweater or even a jacket underneath of it. In case you want to wear less, you should size down by more than two inches. If you like it roomier, size up.


Vintage Peacoat Sizing


Older peacoats were generally cut a little trimmer.  Coats from around World War II were the most fitted ones.


The models from the 1950’s and 1960’s were already a littler bigger, and the 1970’s version is once again bigger but a bit slimmer than the 1980’s versions. The current model is cut the widest. With a WWII coat, a 44L would probably be as wide as  1980’s 42 L.


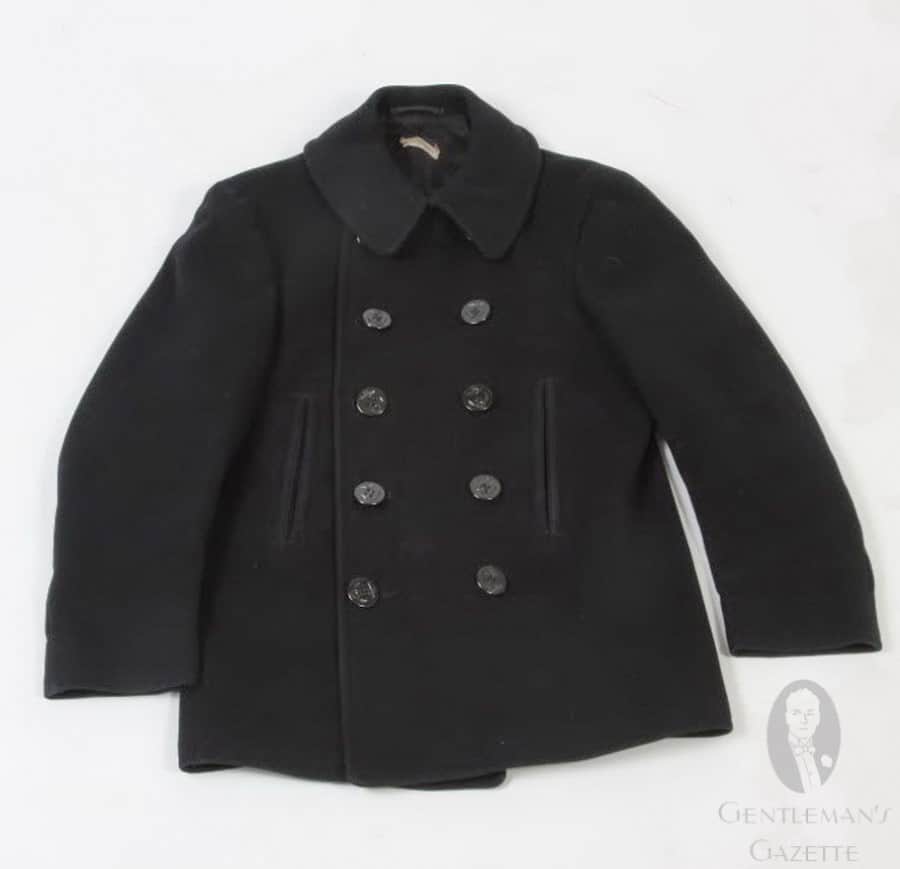
WWII Vintage Pea Coat

WWII Vintage Pea Coat


Sometimes, older coats do not have size measurements and in general, I would always go with measurements instead of sizes. Back length, sleeve length, shoulder width and chest width and maybe the waist should be enough to determine whether it will fit or not. Of course, if you have sloping shoulders or a round back it may not fit you, but an alterations tailor should be able to help you if these primary measurements are correct.


Storm Flap Underneath Collar of WWII Peacoat

Storm Flap Underneath Collar of WWII Peacoat


Sources for Vintage Coats


Ebay probably offers the largest selection of vintage peacoats, but if you live in the US, consignment stores may also offer one every once in a while. I put together a collection of 60+ peacoats here so take a look.


Sources for New Peacoats


There are some other clothing companies that offer peacoats, but most have added their own design elements.


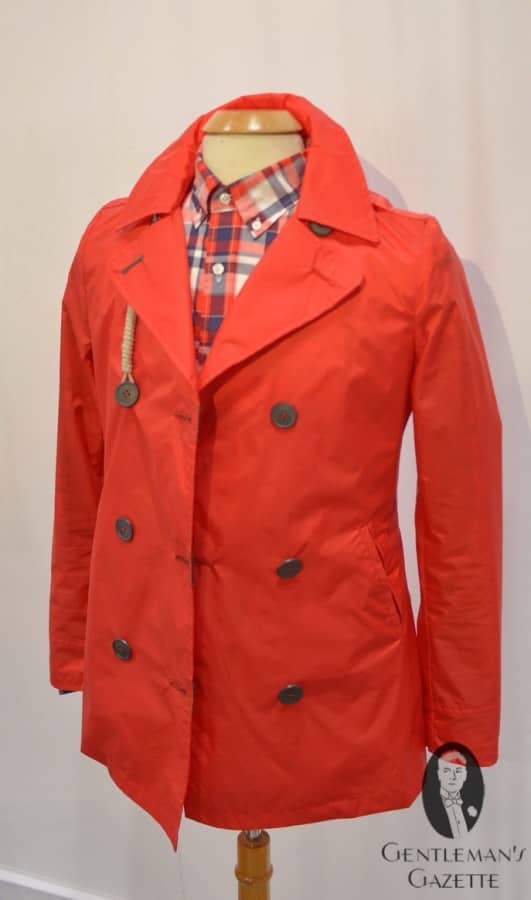
Peacoat in Orange Canvas by Camplin

Peacoat in Orange Canvas by Camplin


If you are not concerned about strict authenticity, the peacoat from Camplin (now Italian-owned) may be the right choice for you. They come in various colors, but they also cost two and a half times as much as the US-made ones.


Army-Navy surplus stores are likely to have the modern wool-synthetic blends; online surplus stores like this one also carry a variety of peacoats. While these are very affordable, and they come in thick 32 oz melton fabric, they are made out of reprocessed wool and nylon fibers, with polyester padding and quilted nylon lining, which is simply unacceptable to me.


Of course, all the fashion brands like Burberry and Aquascutum carry what they call Pea Coats but they are not the real deal. Even houses like Gieves & Hawkes only offer Made in Italy interpretations of the original with flap pockets and cashmere blends… If you like the look of these coats, wear them but these are not peacoats.


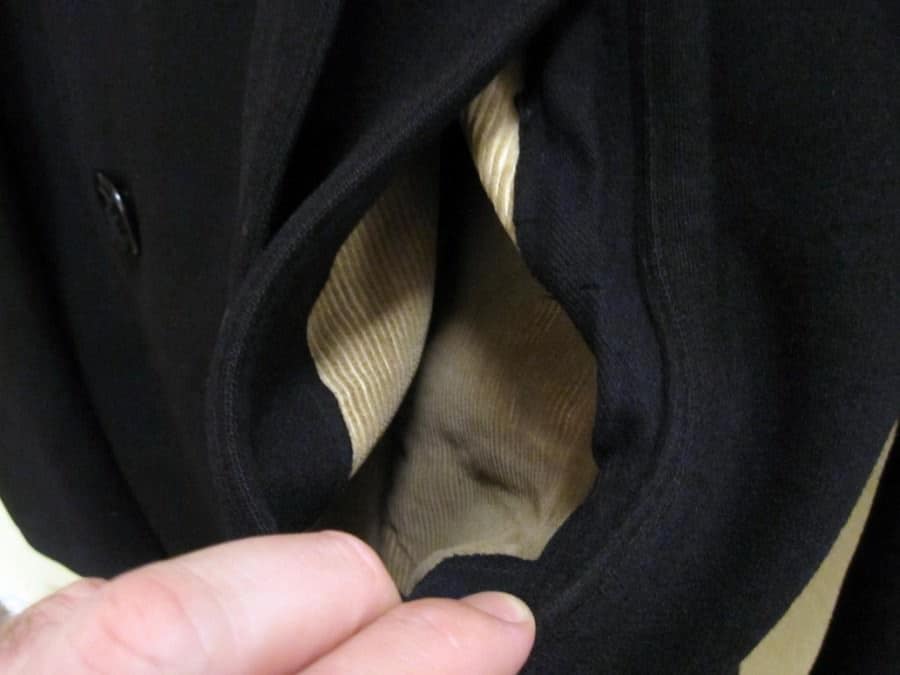
Mid Brown Corduroy Pocket Lining in WWII Peacoat

Mid Brown Corduroy Pocket Lining in WWII Peacoat


How to Date Your Vintage Peacoat


If you came into possession of a vintage peacoat and you wonder how old it is, or you just want to know when certain details like mid-brown corduroy lined pockets were available.


Peacoats From World War I


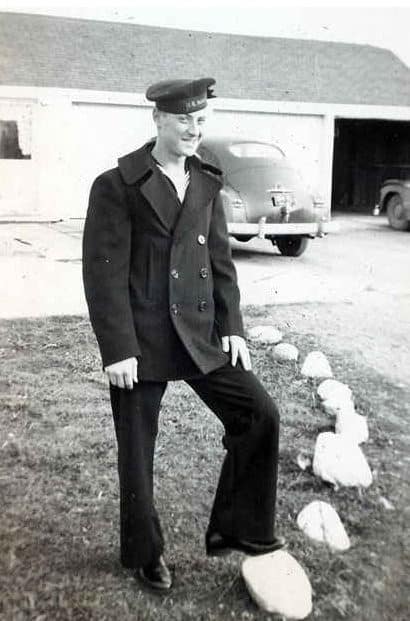
Peacoats have been around for longer, but it is difficult to find older pictures. As you can see the Peacoat had 10 or more buttons, and they were longer. It featured handwarmer pockets as well as flapped pockets. The original buttons featured an anchor with 13 stars around them, and the color was midnight blue. So it should be very easy to date a WWI peacoat if you find one.


Peacoats From World War II


Compared to the WWI peacoats, the hand warmer pockets were placed a bit lower, and the flap pockets disappeared, but it still maintained the 10 button front. The buttons changed considerably and now featured the fouled anchor you may be familiar with today. At the same time, the stars were removed.


The outer shell was still 100% midnight blue Kersey wool, and the pockets were lined with tan or light brown corduroy and inside the chest pocket you could find a label stating “Manufactured By NAVAL CLOTHING FACTORY.”


The fit of WWII peacoats was very tight compared to the ones that followed.


WWII ERA Peacoat

WWII ERA Peacoat


Peacoats Post-World War II


Traditionally, the peacoat had 10 buttons, 8 of which were visible. Sometime after the war the number was reduced to 8 with just 6 visible ones and eventually, just 7 with 6 visible ones.


Because of the reduction in buttons, the lapel got slightly bigger, and you could now see more of the chest or tie. Of course, you could still button it up all the way to keep you warm when needed. Up until the 1970s the 100%, Kersey wool remained unchanged. At some point after that, poly blended wool was offered. The style of the coat was maintained between 1946–1979, though the tags were often different, thus making it difficult to date.


However, little details changed. For example in 1968, the corduroy pocket lining was substituted with a soft blue, white, off-white cotton lining.


From 1974 to 1984 the buttons were exchanged once again, so the shape would match the gold bridge coats but the color was pewter. In 1984, the black fouled anchor button was reintroduced but the bridge coats kept their gold buttons.


During that same period,  Melton was introduced along with some other changes.


6x3 Double Breasted US Navy Pea Coat

6×3 Double Breasted US Navy Pea Coat


For even more details about dating a vintage peacoat, you should take a look here.


Conclusion


In the end, the peacoat is a classic, functional closet staple that has been around for more than three centuries. The original midnight blue version with black anchor buttons is certainly the most popular, but nowadays you do have a choice of different materials and colors. No matter whether you go vintage or new, a peacoat is ideal when you want to keep warm but a long overcoat would be too formal and a puffy down jacket à la Moncler is simply not your style.


пятница, 7 февраля 2020 г.

How to Fold a Pocket Square – My Top 8 Folds for Gentlemen

Pocket squares are one of my favorite accessories, and I hardly ever leave the house without one (except maybe if I’m wearing a big boutonniere, in which case a pocket square would just throw everything off-balance visually). But there are many different ways to fold them–I’ll cover my eight favorites (plus a bonus) today.

Two General Pocket Square Tips

Before we walk through the pocket square folds, it’s important to keep two things in mind; first, different pocket squares have different sizes. For example, those that are too small will likely disappear into your pocket. Ideally, you want something that works perfectly for your chest pocket. At Fort Belvedere, we’re firm believers in producing pocket squares that make you look your best, and that means every material corresponds to a different size, because no two textures, stiffnesses, and weights are the same.

Secondly, as is the case with a self-tied bow tie, you never want your pocket square to look like it’s folded too perfectly, too neatly, or too symmetrically. Why? Because you want to strive for a nonchalant elegance that just looks like the square fell into place, and not like you ironed a fold into the pocket square; this will make it look like a pre-folded one, and that’s never stylish.

1. Classic Fold

The classic fold is also known as the square fold, the straight fold, the TV fold, or the presidential fold. It’s a very traditional fold, typically seen on news anchors, at weddings, or maybe in formal offices at a law firm. Of course, I’ll also show you how to make it look a bit more casual. In general, this type of a fold looks best with linen or cotton pocket squares which have a bit of stiffness to them.

  • With the square laid flat, fold in half once, then a second time (in other words, into quarters)
  • With the rolled edge at the top, fold in the left and right sides (into thirds)
  • Then, fold the bottom upward, so the at the total height of the square corresponds to the depth of your pocket

You may have to adjust it a little bit, until you show about 1/4 to 1/2 an inch out of your pocket. Traditionally, the four corners point toward your left shoulder, though some people prefer it to point the other way.

If I don’t want this kind of a stiff fold, I can arrange the corners so that they’re not completely straight when making the first two folds; this will make the finished square more nonchalant. If you have stronger contrast edges, you can accentuate them a little more this way. If you see an exposed tag (for this fold or any other), just make sure to fold it in so it’s not visible–or start over and just fold in a different direction. To remove a tag, a small pair of nail scissors or a seam ripper is best. 

2. Crown Fold/Point Fold

This one looks particularly good with a contrast edge or some cross stitching, and a square that has a little bit of stiffness to it, such as a linen, wool, or wool-silk square. You can also work with a silk pocket square, just make sure it’s big enough so it doesn’t disappear in your pocket.

  • With the square laid flat, orient it so that the top corner is pointing away from you (like a diamond)
  • Bring the bottom corner (nearest you) up to the top, spacing the corners slightly apart
  • Bring the left and right corners up to the top, also spacing them apart, so you can see all four points
  • Fold in again from both sides, and then fold up to match the depth of your pocket 

You never want this fold to look too symmetrical, otherwise, it looks like a pre-fold pocket square. So, when you start out, you can pull a corner or two slightly higher or lower to be a little more playful. Alternatively, you can space two corners much farther apart during the fold, then compensate at a later fold to make sure the square fits in your pocket.

The third option is to lay the square flat, pinch it in the middle, you pull it through your opposite fist, twist it by half, and then put it in your pocket. The advantage of this fold is that it always looks very effortless, and is always slightly different. Some people like it, others hate it. If you want more consistency, go with the first method; if you want more nonchalance, try the second or third method.

For a crown fold, you want to make sure that you have hand-rolled edges, because they look a lot nicer than machine-hemmed ones. A pocket square is a decorative piece and because of that, you always want to have the best possible edge which is a hand-rolled edge. To learn more about the differences in quality of hand-rolled edges, please check out the video below.

3. Puff Fold/Pinch Fold

This looks particularly dapper in a silk or silk-wool blend, because the folds break light in a very sophisticated way. I’ve made this fold with a linen pocket square before, but if it’s too stiff, chances are it will pop out over the course of the day (which doesn’t look stylish).

  • As with the third method for the point fold above, start with the square laid flat, pinch in the center, and run the square through your opposite fist.
  • Next, twist either by a half or full rotation, then adjust the finished puff to your liking. That’s all!

By creating the rotation, you keep the pocket square and the little folds in place. That way, you can see the light breaks very nicely and very elegantly. Some people like to push the center of the finished puff in on itself at the end; personally, I don’t like it very much because over the course of the day, it’ll just puff out–then in your pocket, you’re left with a big “poof” that’s not very elegant.

A way to get a somewhat more irregular puff is to take the square by one corner and tuck it into your pocket, then repeating with the other three corners, until you’re left with a puff that you like (you won’t be able to add a securing twist this way, however).

4. Upside-Down Puff Fold

I think this one works particularly well with a silk or silk-wool pocket square (linen can be a little stiff). Ideally, the center of your pocket square has a different look than the edges. That way, you do maximum versatility and flexibility and creating a look that is unique.

The upside-down puff fold is very similar to both the point fold and the puff fold:

  • Start by forming a puff fold via the primary method (ending with a twist)
  • Before inserting into your pocket, fold as many of the points up from the bottom as you would like to be exposed behind the puff

The beauty is that you can show anywhere from one to four points, as well as the center (which is ideal if you have something like a central medallion design). The points of the pocket square can be arranged however you like–just make sure your pocket square is large enough so it won’t disappear in your pocket!

5. Shell Fold

This fold is unusual; you don’t see it a lot, it requires a bit of skill, and I like it with a silk or silk-wool pocket square that is sizable, otherwise, it’ll just disappear in your pocket.

  • Start with the square laid flat, with the backside (less colorful) facing up
  • Fold in half diagonally, to create a large triangle
  • Placing your index finger in the center of the long edge, fold in half again, leaving the corners separated slightly (so that the folded edge is at a slight angle, rather than perfectly straight)
  • Take the corners opposite the angled edge and fold them up to the top corners, again creating a slight angle; you should now have what looks like three triangles stacked on top of each other, with the bottom two still slightly visible
  • Fold in the center of the stacked edge, so you’re left with three “shells” to expose from your pocket

As you’ll see, this can look quite symmetrical (again, this is not something you want); pull gently on each of the shells to get a slightly different look that is askew and more elegant. When you use a silk-wool pocket square, the look is a little more matte. On the other hand, if you use a silk pocket square, it’s a little more vibrant.

6. Scallop Fold

This fold really highlights the edges of a pocket square, so it works well with contrasting edges and something that is visually interesting. It is similar to the shell fold in the sense that it uses the curves of the pocket square. I think it looks particularly nice if you have a contrast edge or a cross-stitched edge. The contrast between the edge and the pocket square is important.

  • As with the shell fold, start with the square laid flat and the backside facing up
  • Fold in half diagonally once, leaving the edges slightly askew, so that they’re all exposed
  • Fold in half again along the long (folded edge), again at a slight angle, so you’re left with a triangle whose long side shows multiple pocket square edges
  • With the “edge side” facing away from you, fold the left and right corners down toward the center point
  • Fold in from the left and right sides again, then fold to the depth of your pocket

Scallop Fold
Scallop Fold

Once the square is in your pocket, adjust the scalloped edges just so they’re a little more elegant and nonchalant. You can see the contrast edges create an interesting visual cue. If you’d like, you can also perform the last fold slightly asymmetrically, to get a more unusual, elliptical curve. I just like it when it looks a bit different and not too studied.

7. Rose Fold

This fold works especially well with patterned pocket squares, particularly where the pattern is clearly visible on both sides.

  • Start with the square laid flat and the backside facing up
  • Fold each corner into the center, creating a diamond shape reminiscent of a package
  • Pinch in the center (it may work best to use three fingers), pick up the square, and close your opposite hand around it, in a way reminiscent to the puff fold
  • Pull at the puffed center, insert into your pocket, and adjust so that the corners and center are all displayed to your liking

While similar to the reverse puff fold, this fold differs in that the puff is nestled inside the four corners, suggesting a rose. Using a square with contrast edges and a center medallion, you’ll be able to achieve maximum color variance with this fold.

8. Angel’s Peak Fold

This fold is very similar to a crown fold; I typically prefer the crown, but if you have a contrast edge, the angel’s peak fold puts the contrast in a different position, which can look quite elegant. Just keep in mind that this fold will require adjustment after being inserted into the pocket, so as not to look pre-folded.

  • Begin in the same way as you would for a shell fold: 
    • Start with the square laid flat., then fold in half diagonally to create a large triangle
    • Placing your index finger in the center of the long edge, fold in half again, leaving the corners separated; here, the separation should be more pronounced than with a shell fold
    • Take the corners opposite the angled edge and fold them up to the top corners, again with a pronounced angle; you should now have what looks like three stacked triangles, with each one distinctly visible
  • You can now pull at the inside of the uppermost triangle to create a fourth point
  • Fold the sides inward to slim down the square, then fold to the depth of your pocket

Ideally, you want to pull some of the corners slightly higher and/or lower, just so you get a more effortless look, not something that looks too studied. If you use a linen square with x-stitched edges, the contrast will be elegantly displayed.

Bonus: Stair Fold

Of course, there are plenty of other folds than the eight we’ve profiled here. Another really popular one is the stair fold. Personally, I’m not a big fan of it because it looks very symmetrical, like I got it in a prepackaged set from Men’s Wearhouse. In my mind, the only way a stair fold looks good is if you have a center medallion and a contrast edge, and a silk-wool blend that is soft enough to actually get the right definition. If you have something too springy, like a linen fabric, it just won’t work.

  • With the square laid flat, orient it in a diamond shape
  • Take the point farthest from you and pull it downward, past the point closest to you, creating a shape reminiscent of the Superman logo
  • Still pulling on the same point, pull it back up, making sure to maintain the original fold you created at the top
  • Repeat this process one to three more times, to be left with two to four parallel folds opposite you
  • Fold in half along the parallel folds, in a similar fashion to the shell fold
  • Bring the sides in to slim the square, then insert into your pocket

Stair Fold - I am not really a fan of this particular fold
Stair Fold – I am not really a fan of this particular fold

The highest point on the resulting triangle shape in your pocket can either point toward or away from your tie, whichever you prefer. I always orient the right to be a little higher. As with the shell fold, pull a little bit on each fold and try for a nonchalant look.

Conclusion

I urge you to experiment a bit, because with practice comes better folds. All the quality pocket squares featured in this post are available in our shop. I designed them all myself to make sure they have the proper size, as well as an unusual color scheme that picks up other colors in your outfit, so it always looks harmonious and elegant. If you have a monogrammed pocket square, try using a fold that will place the monogram front and center.

Our Previous Video On This Topic

If you have been with us for a while, you may have already seen our video from years ago on pocket square folding. We’ve come a long way since we first filmed and posted it. Even so, for those interested, here’s our original video!

What are your favorite folds? Please share your thoughts in the comments below!

How to Fold a Pocket Square – My Top 8 Folds for Gentlemen

Pocket squares are one of my favorite accessories, and I hardly ever leave the house without one (except maybe if I’m wearing a big boutonniere, in which case a pocket square would just throw everything off-balance visually). But there are many different ways to fold them–I’ll cover my eight favorites (plus a bonus) today.

Two General Pocket Square Tips

Before we walk through the pocket square folds, it’s important to keep two things in mind; first, different pocket squares have different sizes. For example, those that are too small will likely disappear into your pocket. Ideally, you want something that works perfectly for your chest pocket. At Fort Belvedere, we’re firm believers in producing pocket squares that make you look your best, and that means every material corresponds to a different size, because no two textures, stiffnesses, and weights are the same.

Secondly, as is the case with a self-tied bow tie, you never want your pocket square to look like it’s folded too perfectly, too neatly, or too symmetrically. Why? Because you want to strive for a nonchalant elegance that just looks like the square fell into place, and not like you ironed a fold into the pocket square; this will make it look like a pre-folded one, and that’s never stylish.

1. Classic Fold

The classic fold is also known as the square fold, the straight fold, the TV fold, or the presidential fold. It’s a very traditional fold, typically seen on news anchors, at weddings, or maybe in formal offices at a law firm. Of course, I’ll also show you how to make it look a bit more casual. In general, this type of a fold looks best with linen or cotton pocket squares which have a bit of stiffness to them.

  • With the square laid flat, fold in half once, then a second time (in other words, into quarters)
  • With the rolled edge at the top, fold in the left and right sides (into thirds)
  • Then, fold the bottom upward, so the at the total height of the square corresponds to the depth of your pocket

You may have to adjust it a little bit, until you show about 1/4 to 1/2 an inch out of your pocket. Traditionally, the four corners point toward your left shoulder, though some people prefer it to point the other way.

If I don’t want this kind of a stiff fold, I can arrange the corners so that they’re not completely straight when making the first two folds; this will make the finished square more nonchalant. If you have stronger contrast edges, you can accentuate them a little more this way. If you see an exposed tag (for this fold or any other), just make sure to fold it in so it’s not visible–or start over and just fold in a different direction. To remove a tag, a small pair of nail scissors or a seam ripper is best. 

2. Crown Fold/Point Fold

This one looks particularly good with a contrast edge or some cross stitching, and a square that has a little bit of stiffness to it, such as a linen, wool, or wool-silk square. You can also work with a silk pocket square, just make sure it’s big enough so it doesn’t disappear in your pocket.

  • With the square laid flat, orient it so that the top corner is pointing away from you (like a diamond)
  • Bring the bottom corner (nearest you) up to the top, spacing the corners slightly apart
  • Bring the left and right corners up to the top, also spacing them apart, so you can see all four points
  • Fold in again from both sides, and then fold up to match the depth of your pocket 

You never want this fold to look too symmetrical, otherwise, it looks like a pre-fold pocket square. So, when you start out, you can pull a corner or two slightly higher or lower to be a little more playful. Alternatively, you can space two corners much farther apart during the fold, then compensate at a later fold to make sure the square fits in your pocket.

The third option is to lay the square flat, pinch it in the middle, you pull it through your opposite fist, twist it by half, and then put it in your pocket. The advantage of this fold is that it always looks very effortless, and is always slightly different. Some people like it, others hate it. If you want more consistency, go with the first method; if you want more nonchalance, try the second or third method.

For a crown fold, you want to make sure that you have hand-rolled edges, because they look a lot nicer than machine-hemmed ones. A pocket square is a decorative piece and because of that, you always want to have the best possible edge which is a hand-rolled edge. To learn more about the differences in quality of hand-rolled edges, please check out the video below.

3. Puff Fold/Pinch Fold

This looks particularly dapper in a silk or silk-wool blend, because the folds break light in a very sophisticated way. I’ve made this fold with a linen pocket square before, but if it’s too stiff, chances are it will pop out over the course of the day (which doesn’t look stylish).

  • As with the third method for the point fold above, start with the square laid flat, pinch in the center, and run the square through your opposite fist.
  • Next, twist either by a half or full rotation, then adjust the finished puff to your liking. That’s all!

By creating the rotation, you keep the pocket square and the little folds in place. That way, you can see the light breaks very nicely and very elegantly. Some people like to push the center of the finished puff in on itself at the end; personally, I don’t like it very much because over the course of the day, it’ll just puff out–then in your pocket, you’re left with a big “poof” that’s not very elegant.

A way to get a somewhat more irregular puff is to take the square by one corner and tuck it into your pocket, then repeating with the other three corners, until you’re left with a puff that you like (you won’t be able to add a securing twist this way, however).

4. Upside-Down Puff Fold

I think this one works particularly well with a silk or silk-wool pocket square (linen can be a little stiff). Ideally, the center of your pocket square has a different look than the edges. That way, you do maximum versatility and flexibility and creating a look that is unique.

The upside-down puff fold is very similar to both the point fold and the puff fold:

  • Start by forming a puff fold via the primary method (ending with a twist)
  • Before inserting into your pocket, fold as many of the points up from the bottom as you would like to be exposed behind the puff

The beauty is that you can show anywhere from one to four points, as well as the center (which is ideal if you have something like a central medallion design). The points of the pocket square can be arranged however you like–just make sure your pocket square is large enough so it won’t disappear in your pocket!

5. Shell Fold

This fold is unusual; you don’t see it a lot, it requires a bit of skill, and I like it with a silk or silk-wool pocket square that is sizable, otherwise, it’ll just disappear in your pocket.

  • Start with the square laid flat, with the backside (less colorful) facing up
  • Fold in half diagonally, to create a large triangle
  • Placing your index finger in the center of the long edge, fold in half again, leaving the corners separated slightly (so that the folded edge is at a slight angle, rather than perfectly straight)
  • Take the corners opposite the angled edge and fold them up to the top corners, again creating a slight angle; you should now have what looks like three triangles stacked on top of each other, with the bottom two still slightly visible
  • Fold in the center of the stacked edge, so you’re left with three “shells” to expose from your pocket

As you’ll see, this can look quite symmetrical (again, this is not something you want); pull gently on each of the shells to get a slightly different look that is askew and more elegant. When you use a silk-wool pocket square, the look is a little more matte. On the other hand, if you use a silk pocket square, it’s a little more vibrant.

6. Scallop Fold

This fold really highlights the edges of a pocket square, so it works well with contrasting edges and something that is visually interesting. It is similar to the shell fold in the sense that it uses the curves of the pocket square. I think it looks particularly nice if you have a contrast edge or a cross-stitched edge. The contrast between the edge and the pocket square is important.

  • As with the shell fold, start with the square laid flat and the backside facing up
  • Fold in half diagonally once, leaving the edges slightly askew, so that they’re all exposed
  • Fold in half again along the long (folded edge), again at a slight angle, so you’re left with a triangle whose long side shows multiple pocket square edges
  • With the “edge side” facing away from you, fold the left and right corners down toward the center point
  • Fold in from the left and right sides again, then fold to the depth of your pocket
Scallop Fold
Scallop Fold

Once the square is in your pocket, adjust the scalloped edges just so they’re a little more elegant and nonchalant. You can see the contrast edges create an interesting visual cue. If you’d like, you can also perform the last fold slightly asymmetrically, to get a more unusual, elliptical curve. I just like it when it looks a bit different and not too studied.

7. Rose Fold

This fold works especially well with patterned pocket squares, particularly where the pattern is clearly visible on both sides.

  • Start with the square laid flat and the backside facing up
  • Fold each corner into the center, creating a diamond shape reminiscent of a package
  • Pinch in the center (it may work best to use three fingers), pick up the square, and close your opposite hand around it, in a way reminiscent to the puff fold
  • Pull at the puffed center, insert into your pocket, and adjust so that the corners and center are all displayed to your liking

While similar to the reverse puff fold, this fold differs in that the puff is nestled inside the four corners, suggesting a rose. Using a square with contrast edges and a center medallion, you’ll be able to achieve maximum color variance with this fold.

8. Angel’s Peak Fold

This fold is very similar to a crown fold; I typically prefer the crown, but if you have a contrast edge, the angel’s peak fold puts the contrast in a different position, which can look quite elegant. Just keep in mind that this fold will require adjustment after being inserted into the pocket, so as not to look pre-folded.

  • Begin in the same way as you would for a shell fold: 
    • Start with the square laid flat., then fold in half diagonally to create a large triangle
    • Placing your index finger in the center of the long edge, fold in half again, leaving the corners separated; here, the separation should be more pronounced than with a shell fold
    • Take the corners opposite the angled edge and fold them up to the top corners, again with a pronounced angle; you should now have what looks like three stacked triangles, with each one distinctly visible
  • You can now pull at the inside of the uppermost triangle to create a fourth point
  • Fold the sides inward to slim down the square, then fold to the depth of your pocket

Ideally, you want to pull some of the corners slightly higher and/or lower, just so you get a more effortless look, not something that looks too studied. If you use a linen square with x-stitched edges, the contrast will be elegantly displayed.

Bonus: Stair Fold

Of course, there are plenty of other folds than the eight we’ve profiled here. Another really popular one is the stair fold. Personally, I’m not a big fan of it because it looks very symmetrical, like I got it in a prepackaged set from Men’s Wearhouse. In my mind, the only way a stair fold looks good is if you have a center medallion and a contrast edge, and a silk-wool blend that is soft enough to actually get the right definition. If you have something too springy, like a linen fabric, it just won’t work.

  • With the square laid flat, orient it in a diamond shape
  • Take the point farthest from you and pull it downward, past the point closest to you, creating a shape reminiscent of the Superman logo
  • Still pulling on the same point, pull it back up, making sure to maintain the original fold you created at the top
  • Repeat this process one to three more times, to be left with two to four parallel folds opposite you
  • Fold in half along the parallel folds, in a similar fashion to the shell fold
  • Bring the sides in to slim the square, then insert into your pocket
Stair Fold - I am not really a fan of this particular fold
Stair Fold – I am not really a fan of this particular fold

The highest point on the resulting triangle shape in your pocket can either point toward or away from your tie, whichever you prefer. I always orient the right to be a little higher. As with the shell fold, pull a little bit on each fold and try for a nonchalant look.
Conclusion

I urge you to experiment a bit, because with practice comes better folds. All the quality pocket squares featured in this post are available in our shop. I designed them all myself to make sure they have the proper size, as well as an unusual color scheme that picks up other colors in your outfit, so it always looks harmonious and elegant. If you have a monogrammed pocket square, try using a fold that will place the monogram front and center.

Our Previous Video On This Topic

If you have been with us for a while, you may have already seen our video from years ago on pocket square folding. We’ve come a long way since we first filmed and posted it. Even so, for those interested, here’s our original video!

What are your favorite folds? Please share your thoughts in the comments below!